Braid has become classy and widely accepted in society today. To do black people’s braids, you should prepare the hair by washing, drying, and combing it. After that, part the hair into sections according to your desired style, and then braid the hair to match the braiding style you have chosen. You can use either edge cream or rubber bands to tie and straighten the hair.
Braids are classy and suitable for most lifestyles and personalities. It is easy to make and can be manipulated to suit your preferred style. Also, beyond their appearance, braids can protect the hair and help with hair growth.
Maintaining braids is less expensive, and it can be done in the comfort of your home by a good hairstylist. As you read, you’ll learn more about how to do black people’s braids.
How To Do Black People’s Braids

The most common and popular braids are the box braid and the cornrow braid. It could be done by an expert hair stylist or even someone who has basic hair styling knowledge.
These braids take between 45 minutes to 5 hours to be done depending on the hairstyle, quantity, length, and width. Here are the two common black people braids and how to do them;
1. Box Braids

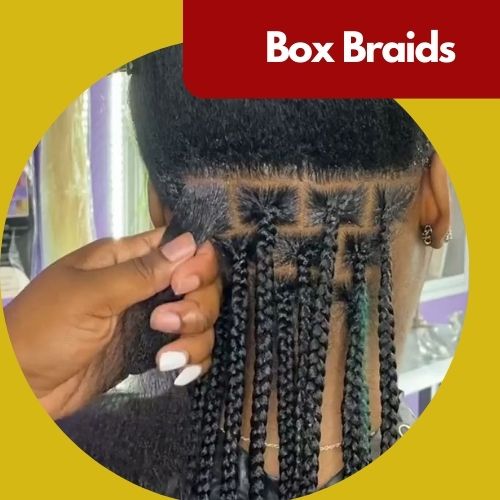
Box braid is a protective style consisting of square-shaped division which permits your natural hair to grow. Using hair extensions alongside your natural hair adds to your hair’s thickness and growth. Unlike the cornrows and other black braids, the box braid is not attached to the scalp.
The box braid is easy to maintain and lasts four to eight weeks. How you part the hair for the box braid depends on the style you want. Here is how to do the box braid with natural, and hair extensions.
Steps on How to do Box Braids with Your Natural Hair:
Step 1
Wash your hair with shampoo and any moisturizing hair conditioner of your choice.
Step 2
Comb the hair gently from the edge to the top to detangle the hair.
Step 3
After the hair is dry, part the hair into three or four separate sections, the sections should be straight squares and equal. Use clips to hold each separate section.
Step 4
Apply hydrating oil gels or cream to the end of your hair to make it moist.
Step 5
Take a smaller part of the first session to create a smaller section. The parts should be equal in size.
Step 6
Divide the section into half from the middle. You can use flexible rubber bands to hold the hair and protect it from breakage.
Step 7
Take part of the divided portion and separate each part into three strands. The right, middle and left strands. Each strand should not be more than an inch thicker.
Step 8
With your index finger, take the right strand over it to the left side and the left strand over to the right. Continue braiding the hair to the edge top by bringing your left and right strand under the middle strand.
Step 9
You can tie it up or use a rubber band at the edge. You can also apply edge control cream to the edge to straighten it.
2. Box Braids with Hair Extensions

If you want to do box braids with synthetic hair, here are the steps on how you can do it;
Step 1
Wash your hair with shampoo and any moisturizing hair conditioner of your choice.
Step 2
Comb the hair gently from the edge to the top to detangle the hair.
Step 3
After the hair is dry, part the hair into three or four separate sections, the sections should be straight squares and equal. Use clips to hold each separate section.
Step 4
Apply hydrating oil gels or cream to the end of your hair to make it moist.
Step 5
Take a smaller part of the first session to create a smaller section. The parts should be equal in size.
Step 6
Divide the section into half from the middle. You can use flexible rubber bands to hold the hair and protect it from breakage.
Step 7
Take 2.5 to 5.1 cm of synthetic hair and place it in a staggered line between your fingers.
Step 8
Take up to one-quarter of the hair separately for new sections and break the hair into 3 sections.
Step 9
Place a section of the hair extensions between your index and middle finger and the next section between your middle finger and ring finger.
Step 10
Place the synthetic hair at the roots of your natural hair. Your natural hair should be in the middle, under the synthetic hair.
Step 11
Continue braiding the hair to the edge top by bringing your left and right hair under the middle hair. Reach under and place the sections again on top of each other.
Step 12
When at the edge, apply edge control cream to the edge to straighten it. Dip the braids in hot water to seal them.
3. Cornrows Braids

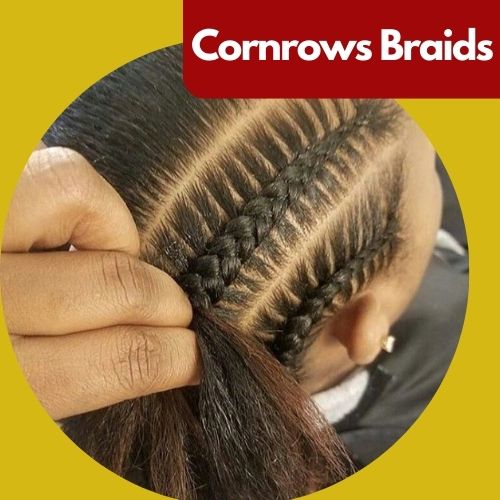
Cornrow braids are styled in simple straight lines, but there are now popular curved styles. You make the cornrow by braiding the hair very close to the scalp, and it’s suitable for both genders. To protect the hair from loss, don’t pull it too tightly, and do not wear it for too long.
How to make basic Cornrows braids with your natural hair:
Step 1
Wash your hair with shampoo and moa moisturizing hair conditioner.
Step 2
Comb the hair gently from the edge to the top to detangle the hair.
Step 3
After the hair is dry, part the hair into sections from the front to the back and use clips to hold each separate section.
Step 4
Apply hydrating oil gels or cream to the end of your hair to make it moist.
Step 5
At the front of the hair, take three strands. Each strand should not be more than 1 inch thick.
Step 6
Cross the left strand through the middle to the right and grab the hair from right to left.
Step 7
After making the first, continue branding by gently adding natural hair to every strand. Braid the cornrow to the back until you get to the edge.
Step 8
At the edge, use a rubber band or tie it up. You can also apply edge control cream to the edge to straighten it.
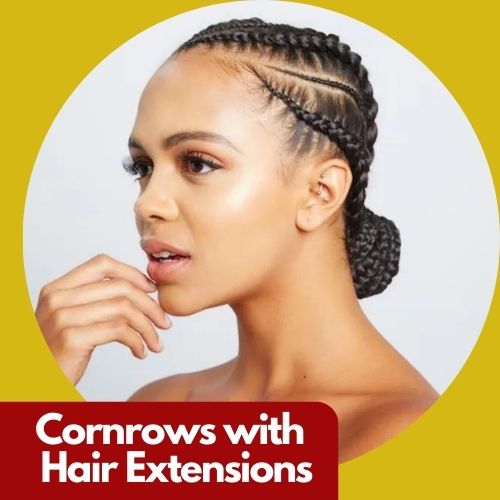
4. Cornrows with Hair Extensions

Here’s how to make a cornrow with synthetic hair
Step 1
Wash your hair with shampoo and a moisturizing hair conditioner.
Step 2
Comb the hair gently from the edge to the top to detangle the hair.
Step 3
After the hair is dry, part the hair into separate sections, the sections depend on the cornrow style you want. Use clips to hold each separate section.
Step 4
Apply hydrating oil gels or cream to the end of your hair to make it moist.
Step 5
Take a smaller part of the first session to create a smaller strand. The strand should be 1 inch thick.
Step 6
Take the synthetic hair and place it between your fingers. Take up another quarter of the hair separately to add to new sections.
Step 7
Place the synthetic hair at the roots of your natural hair. Braid each strand by crossing the left strand through the middle to the right and grabbing the hair from right to left.
Step 8
Add more natural and synthetic hair to each section. If you don’t add more hair with each strand, the braid will be loose and come out from your head.
Step 9
Continue the braid for each row and finish it with an edge control cream of a rubber band.
These styles can help your hair grow by protecting your new hair from breakage. Always make sure you oil your scalp and sections every night to moisturize the edges and protect them from frizz.
Frequently Asked Questions (FAQs)
Which is Better, Box Braids or Cornrows?
Cornrows are easier to make and less expensive to maintain. However, you can try out different styles with box braids. You can wear the box braid loose, in ponytails, or buns.
Do Braids Help Grow Natural Hair?
Braids help your natural hair grow by protecting the hair from breakage and heat. If you regularly run your hands through them, it can cause breakage. The braids keep the hair tress secured in one place and still allow you to caress them.
What’s the Best Braid Style for Natural Hair Growth?
The cornrows braid can be basic or styled as you like. If your cornrow is naturally made, you can comfortably sleep with it without picking too much bed fuzz.
The Box Braids style is the best for any lifestyle. The style can protect the hair from heat, although you should moisturize your braids regularly so the oil in the scalp won’t dry up. The box braid can last for months and is less expensive to maintain.
It’s Your Turn
Following these tips will help you do these braids at your convenience. So, what braid style will best suit your appearance and personality?
